Building Environment
Setting up GCC Building Environment
Building the project in GCC Building Environment (Windows)
Installing mingw with ASDK and setting up the CMake
Download and extract msys64_v10_3.7z from tools folder
Check the windows Environment Variable HOME by Command Prompt
echo %HOME%
Note
If %HOME% is not exist, the command will simply print %HOME%
If your windows already have Environment Variable named HOME, open the file “msys64/etc/post-install/05-home-dir.post”
Add “HOME=<PATH_TO_YOUR_MSYS64>/home/<USER_FOLDER>”.
# If the home directory doesn't exist, create it.
HOME=C:/msys64_v10_3/msys64/home/${USER}
if [ ! -d "${HOME}" ]; then
  if mkdir -p "${HOME}"; then
     echo "Copying skeleton files."
Note
By default <USER_FOLDER> is ${USER}. To prevent some errors, do not include space characters in <USER_FOLDER>
Double click “msys2_shell.cmd” from mysys64 folder
After setting up mingw, you need to install cmake. Download cmake in https://github.com/Kitware/CMake/releases/download/v3.20.0-rc1/cmake-3.20.0-rc1-windows-x86_64.msi and install it
Add location of cmake.exe to PATH of msys2_shell by using vim ~/.bashrc and appending path of cmake.exe to environment variable PATH or using editor to directly append the path to file “msys64/home/<USER_FOLDER>/.bashrc”
export PATH=/c/Program\ Files/CMake/bin:$PATH
Caution
If your PATH contains space characters, remember to use “\” to escape
Note
For the first time adding the CMake PATH, after adding the PATH, you need to re-open the msys2_shell and check the version by:
$ cmake --version
cmake version 3.20.0-rc1

CMake suite maintained and supported by Kitware (kitware.com/cmake).
Adding toolchain to msys2
Like adding PATH for cmake, user can add or change the toolchain in “msys64/home/<USER_FOLDER>/.bashrc”.
Add toolchain PATH by “export PATH=<path to toolchain>:$PATH”.
if [ -d "../../asdk-10.3.0" ]; then
    echo "asdk-10.3.0 exist"
    export PATH=/asdk-10.3.0/mingw32/newlib/bin:$PATH
Note
Recommand to use the latest provided toolchain or use the version after 10.3.0
Building the project
Open mingw by double clicking “msys2_shell.cmd”.
Enter the project location: project/realtek_amebapro2_v0_example/GCC-RELEASE.
Create folder “build” and enter “build” folder.
Run “cmake .. -G”Unix Makefiles” -DCMAKE_TOOLCHAIN_FILE=../toolchain.cmake” to create the makefile.
Run “cmake –build . –target flash” to build and generate flash binary.
Note
If building the project successfully, you can see flash_ntz.bin in the ‘build’ folder
Building the project in GCC Building Environment (LINUX)
Add toolchain to the linux PATH
Extract the toolchain file (the toolchain file may provide in tools folder):
tar -jxvf <PATH_TO_YOUR_TOOLCHAIN.tar.bz2> -C <DIR_TO_EXTRACT>
Add toolchain to PATH:
export PATH=<PATH_TO_YOUR_TOOLCHAIN>/asdk-10.3.0/linux/newlib/bin:$PATH
Note
You can add PATH to ~/.bash_profile
Installing cmake for linux
Install cmake using terminal (like “sudo apt-get -y install cmake”), if the installation is successful, you can get the version by “cmake –version”.
Building the project
Open linux terminal and enter the project location: project/realtek_amebapro2_v0_example/GCC-RELEASE/.
Create folder “build” and enter “build” folder.
Run “cmake .. -G”Unix Makefiles” -DCMAKE_TOOLCHAIN_FILE=../toolchain.cmake” to create the makefile.
Run “cmake –build . –target flash” to build and generate flash binary.
Note
If building the project successfully, you can see flash_ntz.bin in the ‘build’ folder
If the ‘build’ folder has been used by others, you can remove ‘build’ folder first to have clean build
If there’s some permission issues, you can do “chmod -R 777 <PATH_TO_YOUR_SDK>”
Log UART Settings
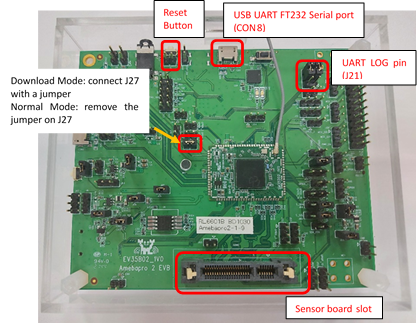
To use AmebaPro2 log UART, the user needs to connect jumpers to J21 for FT232 (CON8).
After using CON8 to connect to PC, you can use console tools (like tera term, MoBaxterm) to get log from EVB by setting baud rate as 115200.
